We contacted Shinobu and he was very happy to offer us a recipe and instructions under one condition, we had to make it ourselves first. As we are inveterate experimenters when it comes to brewing, we heartily agreed. We both made the same recipe so we could do a taste comparison. Shinobu supplied us with the 6.6 lbs of polished rice needed to make one gallon of sake, as we had everything else we needed at the shop.
While there are many different types of sake (see here for more info on the varieties of sake), the type we were making is referred to as “Junmai” which broadly means pure rice sake. The alcohol by volume typically varies between 14 and 18% and is meant to be consumed cold.
Making the Koji Rice (Kome-koji)
The first step in the process was to make Koji rice (Kome-koji), sometimes also called malt rice. The rice must be steamed before adding the Koji mold. This requires thoroughly rinsing about a quarter of the polished rice (~1.6 lbs) and then soaking it in cool water for an hour and a half. After soaking, let it drain in a sieve for around 20 minutes to drain off excess water.
The next step was to steam the rice for one hour. I wrapped the rice in a clean cotton cloth to avoid condensation dripping on it, put it in a large colander and suspended it over a pot of boiling water with a lid on top for one hour. It’s important that the rice does not touch the boiling water, it has to be steamed, not boiled. If you have a large rice steamer you will have an easier time than I did, but it really wasn’t that hard. I knew the rice was finished when it was both translucent and chewy in texture.


I cooled the rice down to 86˚F (30˚C) and put it in a stainless steel bowl. I sprinkled 3 grams of Koji mold (Koji-Kin) evenly across the rice. Then I put the bowl of soon to be Koji rice in my oven without turning the gas on. I put a thermometer in the rice and checked it periodically to make sure it stayed at 86˚F. I kept the oven door slightly ajar and was able to maintain the temperature pretty well. After about 40 hours the rice was covered with a fine white mold, it was now Koji rice!
This may seem like a lot to do, but it is mostly a lot of waiting and is a very important step in the whole process.


If you’re familiar with mashing malted barley for beer, then you’ll see the similarities between the two processes. Koji mold converts the rice starch to sugar just like mashing malted barley does in beer making. The big difference is that the Koji rice is added to more steamed rice and water along with lager yeast. As the mold breaks the starch into sugar the yeast consumes the sugar and creates alcohol. This happens concurrently allowing the yeast to adapt slowly to the alcohol in its environment making it able to ferment higher levels of sugar and survive in more alcohol than it normally can. Typically beer yeasts start stalling out once they reach between 10-12% ABV, but Sake can climb up to 18% due to the addition of the koji mold.
Perfect your Rice Steaming Skills
Once I had the Koji mold ready it was time to…steam more rice. Five pounds of it! I was able to do this in a larger strainer over a larger pot, but if you don’t have a big enough steamer you can do it in batches. The process is the same, rinse, soak, drain, and steam. While I was busy steaming the remaining rice, I used that time to prepare for fermentation. I added the following to a sanitized, 2 gallon food-grade plastic bucket (with lid, to be used later):
- 1 Gallon Water
- 1 Pack Saflager 34/70 Yeast
- 1.5ml Lactic Acid OR 3 grams Citric Acid
- 1.6 lbs Kome-Koji Rice (the previously “koji’d” rice)
We add the acid specifically to help keep any spoilage bacteria from forming during fermentation (bacteria don’t like acidic environments). Once the 5 pounds of rice was finished steaming I cooled it down to room temperature (68˚F, 20˚C). I then added the cooled steamed rice to the water mixture and gently stirred it with a large sanitized steel spoon until all of the rice was submerged. It will be very thick and difficult to mix, so be prepared to get a small workout.
Once everything was mixed well, I covered the bucket lightly with a lid. Making sake starts with an open fermentation so I kept the lid loose. After a few hours the rice absorbed the water and became pretty solid. Doing my best to not break the rice up too much, I stirred the mixture every 6 hours. After a while the Koji mold starts breaking down the rice and liquifying it. It literally turns from a semi-solid into a mostly liquid form as the rice breaks down, which is pretty cool! Each time I stirred I made sure I kept the rice below the water line to prevent any contamination. After about 2 days it was obvious the entire batch had liquified. Now fermentation could begin!


Slow, cool fermentation makes the best sake, which is why we used lager yeast. I put the loosely covered fermenter into my wine cooler at 50˚F, stirring it once a day. I put a small cookie sheet under the fermenter to catch any spillover from fermentation. Good thing I did because it bubbled over after the first few days. I kept the outside of the fermenter clean by wiping it with a paper towel soaked in star san solution.


I stirred the sake every day and watched it ferment and bubble. I waited until there was no noticeable sign of fermentation (about 6 weeks) and then let it sit another two weeks just in case. I tasted it along the way and I was surprised and impressed at how good it was tasting! With beer we usually know when fermentation is complete because we know the Original Gravity and the estimated Final Gravity. There is no easy way to know your ABV (alcohol by volume) with sake as it is fermenting at the same time as starch conversion, and therefore no “true” Original Gravity. There is a calculator that can get you a pretty good approximation of your ABV, but it requires taking both a hydrometer and refractometer reading once your fermentation is complete. My sake came out to 14% ABV.
Once fermentation was finished I could have drank the sake if I felt so inclined. Unfiltered sake is called Doburoku, and it is delicious, but I wanted to experience the whole process and get as much sake out as I could after waiting so long.
I could have just poured the sake into a mesh bag and squeezed it by hand into another vessel and then bottled it, but Shinobu told me my yield would be less. After all this time I wanted as much sake as I could get! I procured another 2 gallon bucket and drilled a bunch of small holes in the bottom. I then poured my sake out of my fermenter into a clean pot, cleaned my fermenting bucket out and put the bucket with the holes drilled in it into the fermenting bucket (and sanitized both buckets).


They were the same size so they stacked. I then took the sake and poured it into a mesh bag in the drilled bucket. I folded the bag over and put another bucket on top with a 20 pound weight as a press. I put a siphon hose on the fermenter spigot and pressed the sake into a one gallon glass jar. I let this go for two days, occasionally flipping the bag of sake over so I pressed every grain. I yielded almost a full gallon of sake in a one gallon jug. It was still somewhat cloudy but no large chunks. I realized while I was doing this method that I could have also put the bag with the sake in it into a colander with a lid and weight on it and pressed it into a pot.


I could have bottled it right then but I wanted it to be clear so I capped the gallon jug and put it in the fridge for a few days until the sediment settled out (also known as “cold-crashing”). Then I simply siphoned the clear sake into bottles which yielded about 3 quarts. I also bottled the cloudy stuff at the bottom because I wanted to see if it was appreciably different. Shinobu told me that the finished sake would not be shelf stable for very long so I had to either drink it quickly, or pasteurize it. If I didn’t pasteurize it it would eventually go sour or become dangerously over-carbonated (i.e. a “bottle-bomb”). So, I opted for pasteurization - which was pretty easy and meant I could enjoy my sake at a reasonable pace.
After I bottled the sake and before I capped the bottles I put the bottles into a pot of boiling water with a thermometer in one of them. Once the sake got to 150˚F I turned off the heat and let it sit for one minute. I then covered the top of the bottles with some foil and let it cool down on my kitchen counter until it was cool to the touch. Then I put it in my fridge to get cold. Once they were cold I capped the bottles.


And there you have it, I had successfully made a gallon of super delicious sake. Unlike the stuff they heat in restaurants in the United States (which Shinobu informed me is usually used for cooking rather than drinking in Japan), my sake was smooth, and slightly sweet with rice aromatics.
Shinobu brought some of the one gallon batch sake he made at the same time as me to our monthly beer swap and I poured the sake that I made. Everyone was really impressed that I could make something almost as good as Shinobu, especially for the first time.
I highly recommend making your own sake, it takes time and some dedication but it is fun and is quite delicious. Learning the process has really informed my appreciation of sake as well - I’ll never look at it in the same way again!

Thank you to Shinobu and Kato sake works for all of their help throughout this project.
John LaPolla


 Cider season is upon us, and while I’m normally a staunch partisan when it comes to beer as the one true drink of the people* I’ve taken the opportunity to dip my toes in the world of hard cider whenever fall has rolled around over the past few years.


 With this beer, I was actually over pitching a little as I was using two 11 gram-dry yeast packets for what are essentially two 2.5 gallons batches but I planned on fermenting at the low end of ale temperatures (60 degrees). If we adjust the fermentation type to Lager (to account for temperature) we can see that we’d want closer to two (1.7) packets of dry yeast.
  A quick rule of thumb to follow is that it is easy to under pitch yeast, but difficult to over pitch. If you’re concerned that you’re not pitching enough, consider a second yeast pack or making a starter. (Here are some
  On Sunday, February 8th at 4pm, Tara Whitsitt of Fermentation on Wheels will be teaching a class on starter cultures used with fermented foods & beverages. She will share and discuss a collection of dairy kefir, tibicos, sourdough, and kombucha starters. We'll also discuss ferments that require inoculation - their history, how to feed them, and the delicious & nourishing foods they create. Attendees are encouraged to bring starter cultures of their own to share and may also purchase a starter culture from the workshop to take home with them. Tickets are available from the calendar link below.
Refund Policy: If you need to back out of the class for any reason, we can only issue a full refund up to 2 weeks before the class starts. If you find yourself missing the deadline, try asking around and see if a friend can take your spot. You’ll get the refund and fill a perfectly good spot. Everyone wins!
]]>
On Sunday, February 8th at 4pm, Tara Whitsitt of Fermentation on Wheels will be teaching a class on starter cultures used with fermented foods & beverages. She will share and discuss a collection of dairy kefir, tibicos, sourdough, and kombucha starters. We'll also discuss ferments that require inoculation - their history, how to feed them, and the delicious & nourishing foods they create. Attendees are encouraged to bring starter cultures of their own to share and may also purchase a starter culture from the workshop to take home with them. Tickets are available from the calendar link below.
Refund Policy: If you need to back out of the class for any reason, we can only issue a full refund up to 2 weeks before the class starts. If you find yourself missing the deadline, try asking around and see if a friend can take your spot. You’ll get the refund and fill a perfectly good spot. Everyone wins!
]]>
 (1) https://sites.google.com/site/brunwater/water-knowledge]]>
 Join us for our first annual Beer and Pie tasting day at Bitter & Esters. In celebration of National Pie Day, you are invited to Bitter & Esters for Beer & Pie day on January 23rd from 7-10pm. Volunteers have donated 25 pies and 10 homebrews for tasting and pairing - all for only $10! Tickets are limited so sign up soon! National Pie Day was started in the 1970's by Charlie Papazian, homebrew guru and author of the Complete Joy of Homebrewing. Charlie used to be an elementary school teacher and decided that it would be a good idea to start National Pie Day on his birthday so that he could get students to bring him pie! Pie day has since gone national and Bitter & Esters felt that we should add beer into the mix! Charlie Papazian is aware of the event and very proud of how we are celebrating his 64th birthday. Here is a short video of Charlie talking about pie day. All proceeds raised will be split between Charlie's favorite charity, the Bixby School in Boulder Colorado and Breast Cancer research.]]>


 In October, pretty much out of nowhere, Charlie Papazian, the guy who taught us all to "relax, don't worry and have a homebrew" came to the store for one of our Bottle Swaps. The store was packed with people and it was an awesome madhouse. It was such an honor for us as homebrewers to have him visit. He had a great time and loved all of you. It was a night to remember.
 Other cool events happened this year too. Pouring lager in the old lager caves of Nassau Brewery right around the corner from the store, courtesy of Josh Bernstein. Appearing on Bric Arts television with Cassy Solof for Pride of Brooklyn, plus pouring beer at P.O.B. the next day. Speaking of television, I got to be all nerdy on CUNY Science TV this year talking about the science of beer.
Our very own Pro Am Brewer's P.I.T. was the event of the Summer . Hosted by our friends at Covenhoven, it was a beautiful day of homebrewers and pro brewers coming together. The winner of Brewer's P.I.T., Frank Lockwood, got to brew with Chris Cuzme at 508. The release night for that beer was epic.
Other cool events happened this year too. Pouring lager in the old lager caves of Nassau Brewery right around the corner from the store, courtesy of Josh Bernstein. Appearing on Bric Arts television with Cassy Solof for Pride of Brooklyn, plus pouring beer at P.O.B. the next day. Speaking of television, I got to be all nerdy on CUNY Science TV this year talking about the science of beer.
Our very own Pro Am Brewer's P.I.T. was the event of the Summer . Hosted by our friends at Covenhoven, it was a beautiful day of homebrewers and pro brewers coming together. The winner of Brewer's P.I.T., Frank Lockwood, got to brew with Chris Cuzme at 508. The release night for that beer was epic.
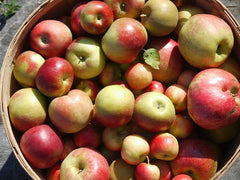
 For New York City Cider week our friends Joy and Jeremy of Proper Cider brought their crusher and presses and we had people bring their apples to get fresh juice to make hard cider. So much fun, thanks guys. This year I hope to taste the ciders that were made that day.
 Tara Whitsitt and Fermentation on Wheels visited us the next day. We had free fermentation workshops, featuring Eric Childs of Kombucha Brooklyn and Mary Izett of Fuhmentaboudit! Speaking of Fuhmentaboudit!, I was fortunate to be guest host for a few episodes this year.
Besides being a homebrew shop we are also New York State's only brew on premises. We had a lot of fun brewing beer with people for birthdays, bachelor parties, even some people doing test batches for their breweries.. Nomad restaurant brewed for their holiday party, Union beer brewed for their cicerone class, Kombucha brooklyn brewed for the hell of it and my favorite one was Rina and Elliot Choi brewing 60 gallons of beer for their wedding. Congratulations!
Cool classes this year too. In addition to our Brewshop 101, all grain, hops and yeast classes, Tamara Connoly of We Are How had one on the business of branding your brew (very important to all you aspiring brewery owners). We also had our intensive three day Brewprenticeship class. We had a couple of popular free demos on kegging and brew in a bag as well.
Tara Whitsitt and Fermentation on Wheels visited us the next day. We had free fermentation workshops, featuring Eric Childs of Kombucha Brooklyn and Mary Izett of Fuhmentaboudit! Speaking of Fuhmentaboudit!, I was fortunate to be guest host for a few episodes this year.
Besides being a homebrew shop we are also New York State's only brew on premises. We had a lot of fun brewing beer with people for birthdays, bachelor parties, even some people doing test batches for their breweries.. Nomad restaurant brewed for their holiday party, Union beer brewed for their cicerone class, Kombucha brooklyn brewed for the hell of it and my favorite one was Rina and Elliot Choi brewing 60 gallons of beer for their wedding. Congratulations!
Cool classes this year too. In addition to our Brewshop 101, all grain, hops and yeast classes, Tamara Connoly of We Are How had one on the business of branding your brew (very important to all you aspiring brewery owners). We also had our intensive three day Brewprenticeship class. We had a couple of popular free demos on kegging and brew in a bag as well.
 Our friend and employee Sam left for bicycle trips to the unknown and was replaced with Bobby from New Orleans who has hit it off big with our community. Our former employee Ovieh is now back and picking up where he left off and our Certified Tastemaster General ® (aka John Hagen) had a beautiful baby boy.
Speaking of community, our free monthly bottle swaps on the first Wednesday are getting bigger and bigger. The beers pouring are amazing and the community of brewers is fantastic. Congratulations to all of the coveted cup winners. You all rock!
Like I said it's been a helluva year. It started with Brew for Autism on Staten Island and will start with it again on January 24th.
We have even bigger plans this year. New classes, new recipes, exciting guests, cool events. Stay tuned.
We owe all of this to you. When Doug and I came up with the idea for the store four years ago, we knew we would work hard, have fun and drink a lot of good beer. Your contribution to the homebrewing community has been outstanding. It has been your support and awesomeness that has made each year better than the last.
Thank you.
Our friend and employee Sam left for bicycle trips to the unknown and was replaced with Bobby from New Orleans who has hit it off big with our community. Our former employee Ovieh is now back and picking up where he left off and our Certified Tastemaster General ® (aka John Hagen) had a beautiful baby boy.
Speaking of community, our free monthly bottle swaps on the first Wednesday are getting bigger and bigger. The beers pouring are amazing and the community of brewers is fantastic. Congratulations to all of the coveted cup winners. You all rock!
Like I said it's been a helluva year. It started with Brew for Autism on Staten Island and will start with it again on January 24th.
We have even bigger plans this year. New classes, new recipes, exciting guests, cool events. Stay tuned.
We owe all of this to you. When Doug and I came up with the idea for the store four years ago, we knew we would work hard, have fun and drink a lot of good beer. Your contribution to the homebrewing community has been outstanding. It has been your support and awesomeness that has made each year better than the last.
Thank you.
 John]]>
 If George Washington can write his own beer recipes, so can you.[/caption] I have been brewing beer since 1992. At first I brewed other peoples recipes, giving me confidence and knowledge about the ingredients and brewing process. But after a while everyone wants to try their hand at writing a recipe on their own. I write 99% of all the recipes at Bitter & Esters, both the ones in our recipe books and everything for the Brew on Premises. Quite often I am asked how do I go about coming up with a recipe. My first step of course is to determine what kind of beer do I want to write a recipe for? If I am brewing for myself I take the season into account. Not just what styles taste good for the season but what temperature I have for fermentation. There are ways to manipulate fermentation temperature but if your closet is at a steady 60˚F during the winter, it's a good time to make a Kolsch. If it is at 95˚F during the summer it is a good time to make a Saison. I don't necessarily let that determine the beer I am making as I drink all beer all the time. If I want to make a Saison in the winter, I will make it work. Sometimes it is easier to work with what you have. Next I will think,what do I want to drink in the next 4 to 8 weeks? That's pretty easy because again I like to drink everything. I usually like to make something new every time I brew or at least a variation of a style that I have brewed before. Once I know what style I want to make I will then do some research on the style, especially if I have never brewed it before. This is particularly important for the beers I write for the store, because you all are brewing it and I want you to love what you make. The very best way to research a beer is to drink other brewers versions of it. I will go to a beer bar or bottle shop and try the beer style I am attempting and try to determine the different aromas and flavors and take notes on what I like and what I would change. Our monthly beer swap is great for this because I can try other homebrewers takes on beer styles, adjunct/spice additions etc. Brewers are constantly asking each other about the ingredients in each others beer to gain and share knowledge. Research is a great excuse to try lots of beer! If I am trying to clone a specific brewery's beer I will look that brewery and beer up on the internet. Many of the craft breweries today will list their ingredients and numbers in the beer description on their site. I have even wrote breweries and had them send me their recipe! Not all breweries will do this but it's worth a shot. Zymurgy magazine also publishes brewery recipes both in the magazine and online. You can only access this if you are a member of the American Homebrewers Association, so join today! Sometimes I will look up the style in the BJCP guidelines. This will give me an idea of the parameters that are considered right for the style. OG, FG, alcohol content, beer color, aroma, flavor, and mouthfeel. They also give you history of the beer and what ingredients are traditionally used. If I still need some inspiration I will search forums like Homebrewtalk and see what other people have tried. And last but certainly not least I will refer to Brewing Classic Styles by John Palmer and Jamil Zainasheff. This book has tips and recipes for over 80 styles. They seem to have deliberately wrote these recipes for modification, it is an incredibly handy tool when formulating your recipe. Once I have a good idea of what I am making, I personally use Brewtoad, which is a free online recipe formulation calculator. You can choose the style you are creating and they will let you know if your recipe falls within BJCP parameters. If you are not brewing for competition it is okay to go outside the box as it were. They are guidelines and it is your beer, but it is nice to see if you are hitting the marks. I will enter my grain bill, my hop additions and my yeast strain. Yeast choice is very important and kind of fun. Sometimes I will split my wort into two fermenters and pitch two different yeasts, or maybe try a blend. Wyeast's website is great for giving you yeast properties and flavors and what styles work best with what strains. I will tweak around with my recipe until I get something that looks like the beer I am envisioning. I'll do the mash calculations and I will also run my water numbers through John Palmer's water calculator and adjust my mash and/or boil with salts according to style. New York City water is great because it gives you a pretty blank canvas to start from. Once I am happy with the recipe there is only one more thing to do, and that is brew the beer. Brewing the beer is the only way to know exactly how that beer will come out. This is why taking notes during brewing is so important. There are so many variables that can affect your beer and if you are completely happy with how it came out you will want to do it again. Or maybe you want to change something but at least you now have a place to start from. That is the beauty of being a homebrewer, we can do whatever we want and then do it again or do something completely different. The more you research and the more you brew the easier it will be to formulate recipes according to your desires. Good luck and keep brewing! John
  ]]>
]]>
 ]]>
]]>
 Once the apples were ground and pressed you took your cider home and added yeast. Primary fermentation is around one month and then you transfer to a secondary for about 5 months. The leftover apple stuff is called pumice. Andy from Aaron Burr cider took the pumice home to feed his cows! During the day, Andy and Joy and Jeremy poured samples of their delicious ciders for everyone to enjoy. It was a great day. A chance for New Yorkers to get the freshest cider possible, be involved with the grinding and crushing process and ask questions of three awesome cider makers. Thank you Joy and Jeremy, Andy and Anthony. It was such fun and a great community experience. Plus Joy and Jeremy got an amazing NY Post article out of it! I hope we get to do it again next year. It was a real highlight of the fall. The next step is to try everyone's cider! Hopefully in 6 months or so we can get everyone back together for a proper cider tasting. John P.S. Thanks to Carla Coria for all the wonderful photographs!]]>
 After a brief talk and q&a Charlie got down to signing books. We had set up an area for him to sign but instead he just walked around the crowd, signing, talking and trying everyone's beers. We were all having a blast and Charlie was one of us. Around 8 we picked four beers for Charlie to try and declare who would win a Brauler and one of Charlie's books. We shouted out nominations and then pointed to the nominees we felt deserved the chance (very scientific I know). The four nominees were Robert Sherril, Brian DeAngelo, Will Reder and Sheri Jewhurst. I was right next to Charlie as he judged. At one point he turned to me and said,"I don't know who to pick! They are all so good!" He deliberated for some time and announced Robert as the winner. Congratulations Robert! Charlie told me all of the beers he tried at the swap were very good. He was impressed and I was happy he got to see a slice of NYC homebrewing. By 8:30 Charlie's publicist Maria told me they had to go soon, Charlie had a 6am flight! I could tell he would have stayed all night. We were all having such a good time. What an amazing experience, something I will never forget. Thanks to Aisha, Maria, all of the B&E staff and all of our wonderful friends and customers. Our community is the best. And of course, Thank you Charlie. John]]>
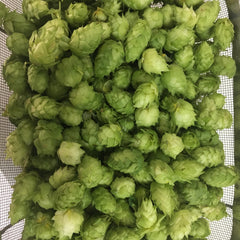
 When most people hear the word "Glacier" it usually conjures heart-wrenching images of polar bears on tiny ice floes, the spawning point for icebergs that result in intercontinental tragedies (and by that I mean Celine Dion ballads), or even Bill Nye the Science Guy arguing facts backed by empirical data against some dude who just isn't convinced on Fox News. But we're not most people, we're brewers!
As brewers, we should be thinking about this low alpha dual purpose hop. Glacier was released in 2000 by Washington State University right about the same time that the high alpha dual purpose craze was really starting to hit its stride. This may be part of the reason that this outstanding hop has flown somewhat under the radar.
For a lower IBU beer, Glacier's balanced bittering and low cohumulone levels have got you covered. It yields a peachy/apricot stone fruit flavor which can border on the more pineapple-like tropical qualities in higher concentrations. That is all well and good, but where Glacier really shines is in its usage beyond the 15 minute mark. The aroma it imparts goes right back to that peachy stone fruit thing when used late in the boil, but when used as a flame out/dry hop it brings out earthy, pear-like qualities.
Glacier's versatility lends itself to any brew with a need for lower alpha bittering (but its higher beta acids should garner some consideration if it is something you plan to store for an extended period) and for just about any pale ale you can conjure up. It will perform well as a later addition in any I.P.A., especially when used in conjunction with more unique hops like Galaxy and Mosaic, or as a contrast hop to round out the flavor of something more citrusy and floral like Centennial. My suggestion is tossing it in as a dry hop in your favorite pale ale. Our very own Resistor, Mystical Cap No. 6, and Paradise Pale Ale are the ones that immediately come to mind, but however you decide to use Glacier, I really don't think you can go wrong.
Bobby B
When most people hear the word "Glacier" it usually conjures heart-wrenching images of polar bears on tiny ice floes, the spawning point for icebergs that result in intercontinental tragedies (and by that I mean Celine Dion ballads), or even Bill Nye the Science Guy arguing facts backed by empirical data against some dude who just isn't convinced on Fox News. But we're not most people, we're brewers!
As brewers, we should be thinking about this low alpha dual purpose hop. Glacier was released in 2000 by Washington State University right about the same time that the high alpha dual purpose craze was really starting to hit its stride. This may be part of the reason that this outstanding hop has flown somewhat under the radar.
For a lower IBU beer, Glacier's balanced bittering and low cohumulone levels have got you covered. It yields a peachy/apricot stone fruit flavor which can border on the more pineapple-like tropical qualities in higher concentrations. That is all well and good, but where Glacier really shines is in its usage beyond the 15 minute mark. The aroma it imparts goes right back to that peachy stone fruit thing when used late in the boil, but when used as a flame out/dry hop it brings out earthy, pear-like qualities.
Glacier's versatility lends itself to any brew with a need for lower alpha bittering (but its higher beta acids should garner some consideration if it is something you plan to store for an extended period) and for just about any pale ale you can conjure up. It will perform well as a later addition in any I.P.A., especially when used in conjunction with more unique hops like Galaxy and Mosaic, or as a contrast hop to round out the flavor of something more citrusy and floral like Centennial. My suggestion is tossing it in as a dry hop in your favorite pale ale. Our very own Resistor, Mystical Cap No. 6, and Paradise Pale Ale are the ones that immediately come to mind, but however you decide to use Glacier, I really don't think you can go wrong.
Bobby B
 ]]>
]]>